
How to Add Closet Shelves Without Drilling
You love your closet, but it is not working hard enough. Clothes are piling up, linens are spilling out, and you are tired of digging through stacks every morning. Drilling into walls might seem like the only way to fix it, but if you are a renter, live in an RV, or just hate leaving permanent holes, there is good news: you can add shelves to a closet without drilling.
This is not about makeshift solutions that wobble or fail after a week. These are real, tested methods that deliver lasting storage without power tools, without damage, and without landlord complaints. Whether you are organizing a tiny apartment, a camper wardrobe, or a future-proof home closet, you will learn how to maximize space without touching a drill.
Let us dive into the best no-drill shelving strategies that actually work.
Build Compression-Fit Wood Shelves
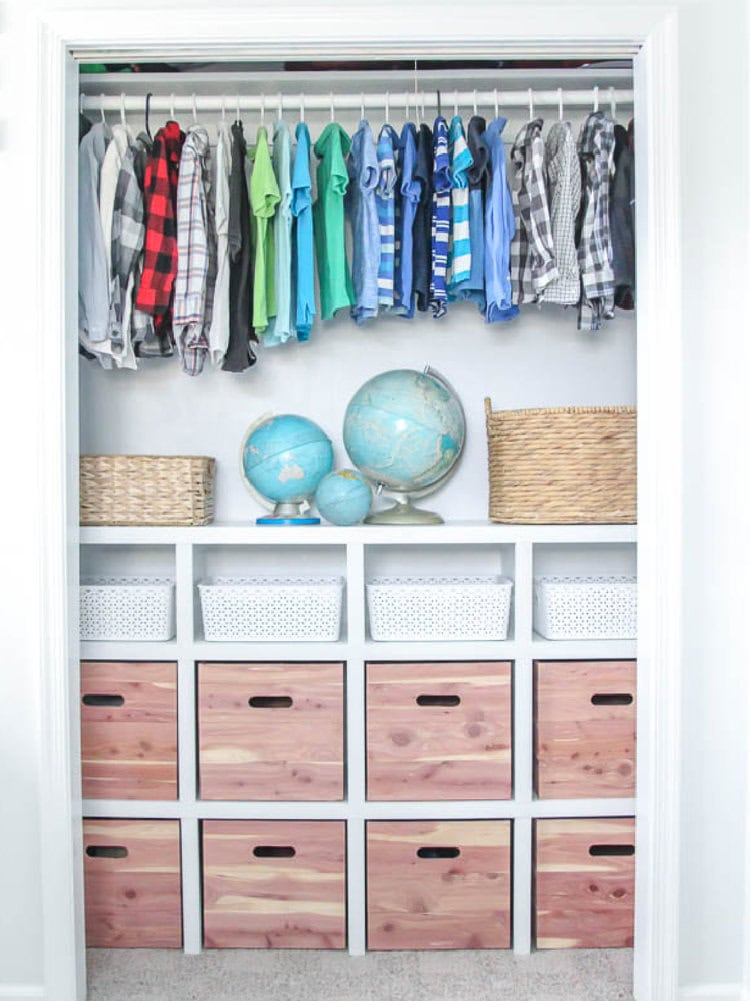
Compression-fit shelves rely on tight pressure between walls to stay upright. Two vertical side panels press against the left and right walls of your closet. Horizontal shelves fit snugly between them, acting as braces that prevent the whole unit from collapsing. The tighter the fit, the stronger it becomes.
How to Build Wedge-Fit Shelves
-
Measure Your Closet Precisely
Get exact width, depth, and height. Subtract 1/8 inch from the width so shelves slide in with firm resistance. -
Cut Side Panels
Use 1/2 inch plywood or 1×8 boards cut to height and depth. These go against the side walls. -
Attach Cleats for Shelf Support
Glue quarter-round molding horizontally onto the side panels at desired heights. Clamp until dry, then reinforce with 5/8 inch brad nails for internal strength only. -
Cut Shelves to Press-Fit
Cut wood planks to width so they push tightly between side panels. Even a 1/16 inch gap can cause wobbling. -
Sand and Finish
Smooth all edges to protect fabrics. Paint or stain if desired. -
Assemble Inside Closet
Stand side panels upright. Slide shelves into cleats, pressing them side-to-side until the unit feels solid.
Pro Tip: Wipe excess glue with soapy water during assembly to prevent messy cleanup later.
Why This Works in Tight Spaces
This method is ideal for narrow closets, wardrobes, and campers where every inch counts. One user doubled their storage in a camper by building this system with no damage and full reversibility. The load capacity reaches up to 25 pounds per shelf when built with precise fit and cleats.
Avoid This Method If: Your walls are not parallel or shelf depth exceeds 14 inches.
Install Freestanding Closet Shelves
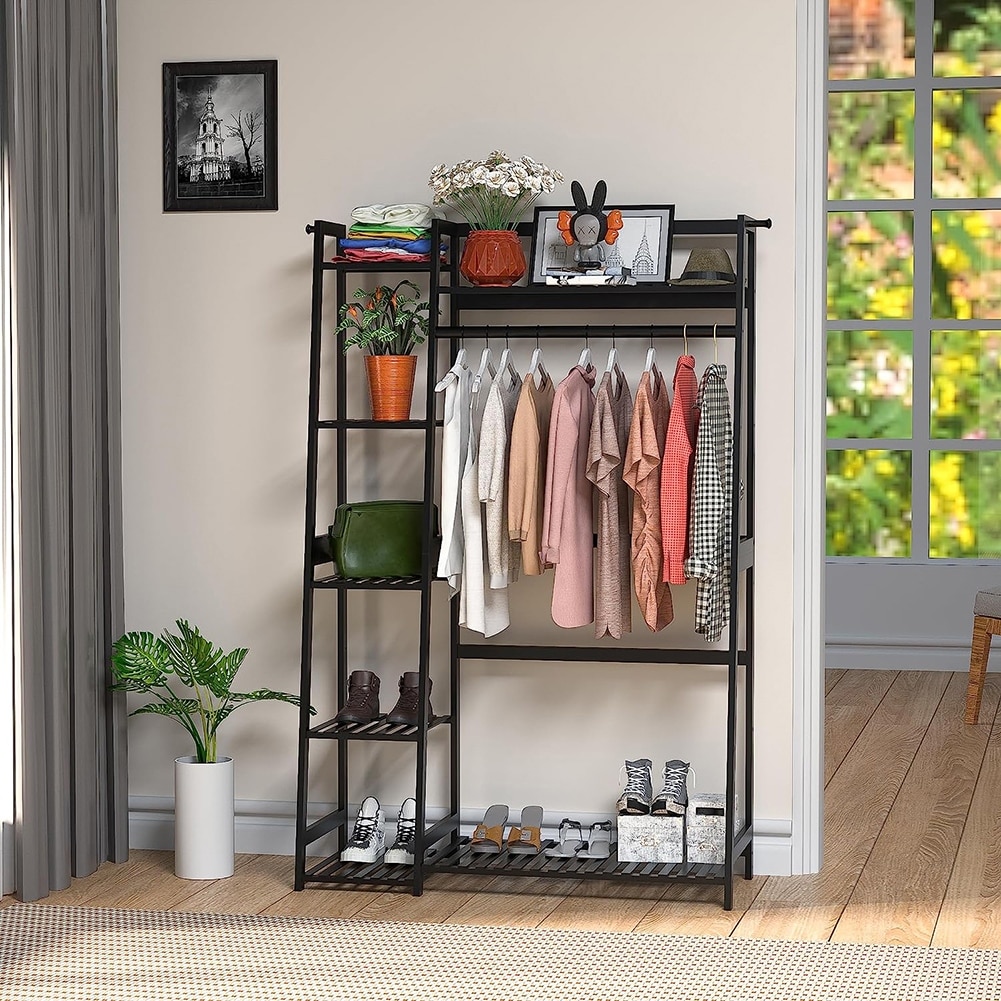
Freestanding shelves do not attach to anything. They simply slide into open floor space inside your closet, making them the easiest no-drill option.
Choose the Right Freestanding Unit
These shelves do not attach to anything. They simply slide into open floor space inside your closet. Best options include:
- Bamboo shelves: Lightweight, stylish, eco-friendly
- Metal wire racks: Durable, ventilated, great for shoes
- Cube organizers like IKEA KALLAX: Modular and customizable
- Stackable plastic bins with shelf inserts: Budget-friendly and flexible
How to Fit a Freestanding Unit Into Your Closet
-
Measure the Opening and Depth
Ensure the unit fits through the closet door and does not block the rod. -
Remove Rod If Necessary
Free up floor space by taking out the hanging bar. Save it for reinstallation later. -
Slide Unit Into Place
Position beside or under remaining hanging sections to use dead zones. -
Add Bins and Labels
Use fabric bins or baskets to sort items. Label for quick access.
Real-Life Example
A homeowner transformed a messy broom closet by removing the rod, painting the interior white, and installing a bamboo shelf unit. With labeled woven bins, everything from cleaning sprays to extension cords now has a home. If you take it out, you can always reuse it under the bed or in the pantry.
Load Capacity: 10 to 15 pounds per shelf for bamboo, higher for metal units.
Mount Shelves with Adhesive Strips
High-strength adhesives let you hang lightweight storage securely without screws. Products like Command Strips, 3M VHB tape, and adhesive shelf brackets turn flat-backed items into damage-free storage.
Recommended Adhesive Products
- Command Large Picture Hanging Strips: Up to 16 pounds
- Jumbo Command Hooks: 7.5 pounds each
- 3M Dual Lock Tape: Industrial-grade hold
- Removable shelf brackets with adhesive pads: For floating shelf builds
Install an Adhesive Shelf Step-by-Step
-
Clean the Wall
Wipe area with rubbing alcohol. Dirt or grease kills adhesion. -
Mark Shelf Height
Use a level to draw a straight line. -
Apply Strips or Tape
Stick to back of shelf or bracket. Press firmly for 30 seconds. -
Wait One Hour
Let the bond cure before adding weight. -
Load Gently
Start with light items like scarves, hats, or toiletries. -
Remove Later
Pull the tab slowly downward. Command strips release cleanly when pulled correctly.
Creative Hack for Heavier Items
Even products designed for screws, like vacuum tool holders, can go no-drill. Just cover the back with multiple Command strips. One user mounted a metal organizer this way, holding brushes and attachments with zero slippage.
Load Tip: Double or triple strips for heavier loads, but always stay under the maximum rating.
Leverage Existing Closet Rods

Use existing hardware to support shelves without new holes. Most closets have metal or plastic rod brackets anchored into walls. Instead of drilling new ones, repurpose these to hold a shelf base.
Build a Rod-Supported Shelf
-
Remove the Hanging Rod
Keep brackets in place. -
Cut a 1×4 or 1×6 Board
Match length to closet width. -
Rest Board Across Brackets
Position at desired height like 16 or 32 inches from floor. Use a level. -
Secure with Screws Into Wood Only
Drive screws through brackets into the board. No new wall drilling. -
Add Perpendicular Cleats
Nail small wood blocks underneath to support the shelf surface. -
Attach Shelf Board
Use a Rubbermaid laminated shelf, plywood, or MDF. Screw or nail into cleats. -
Finish for Style
Prime with Kilz, paint white, or leave natural.
Result: A 25 dollar built-in look that holds 30 plus pounds per shelf.
Why It Works: Uses original anchor points with no new damage and full reversibility.
Pick the Right Materials for Your Needs
Match your shelf build to what you are storing and where it will go.
| Use Case | Best Material | Why It Works |
|---|---|---|
| Light storage like towels and clothes | Bamboo, thin plywood | Easy to cut, lightweight |
| Heavy items like books and tools | 1×6 pine, poplar, MDF | Strong and stable under load |
| Humid areas like RVs and bathrooms | Laminated board like Rubbermaid | Will not warp or swell |
| Temporary or reusable | Pre-finished boards, modular kits | No sanding or painting needed |
Pro Tip: Laminated shelves resist moisture and require zero finishing, perfect for campers and rentals.
Tools You Will Actually Need
You do not need a full workshop. Here is what helps:
- Measuring tape and pencil: Precision is everything
- Level: Keeps shelves straight
- Saw: For cutting wood
- Clamps: Hold cleats during glue-up
- Wood glue: Bonds internal parts
- Sandpaper: Smooths edges
- Paintbrushes: For finishing touches
Keep a bottle of soapy water and rag handy to clean up glue squeeze-out instantly.
Know the Load Limits
Avoid collapse by respecting weight capacity.
| Method | Max Load Per Shelf | Reinforcement Tips |
|---|---|---|
| Compression-fit wood | 15 to 25 pounds | Tighter fit and thicker cleats |
| Freestanding bamboo | 10 to 15 pounds | Center load and avoid edges |
| Adhesive-mounted | Up to 16 pounds | Use multiple strips and wait 1 hour |
| Rod-supported | 30 plus pounds | Use 1×6 board and secure brackets |
Warning: Never overload adhesive shelves. Start light and test before adding weight.
Design for Style and Function
No-drill does not mean ugly. Make it look intentional.
- Paint shelves white after priming with Kilz for a built-in look
- Choose natural wood for warmth like pine, bamboo, or poplar
- Label bins with a label maker to boost efficiency
- Match shelf color to walls for seamless blending
One user painted their DIY unit white and said it looked like it was always supposed to be there.
Maintain Your No-Drill Shelves
Keep them safe and stable over time.
- Dust monthly: Prevents buildup that can affect fit
- Check compression fit: Wood expands in humidity
- Re-press adhesive mounts if sagging occurs
- Do not overload: Stick to rated capacity
- Store flat when not in use: Prevents warping
Real-World Use Cases
Renter Closet Makeover
Goal: Add storage without breaking the lease
Solution: Freestanding bamboo shelf plus adhesive hooks
Result: Organized cleaning supplies, yoga mat, and linens. Removed cleanly at move-out.
Camper Wardrobe Upgrade
Goal: Maximize tiny space
Solution: Custom wedge-fit plywood shelves
Result: Doubled storage, removable, no wall damage.
Future-Proof Home Closet
Goal: Avoid permanent changes
Solution: Rod-supported shelf plus modular bins
Result: Flexible system ready for reconfiguration.
Frequently Asked Questions About Adding Closet Shelves Without Drilling
Can I really add shelves to a closet without drilling?
Yes. Multiple proven methods exist including compression-fit wood shelves, freestanding units, adhesive mounting strips, and repurposing existing closet rods. All are fully reversible and renter-friendly.
What is the strongest no-drill shelf method?
Rod-supported shelves offer the highest load capacity at 30 plus pounds per shelf. They use existing closet brackets to support lumber and shelving boards without new wall holes.
Do adhesive strips hold heavy items?
Command strips and similar adhesives hold up to 16 pounds when used correctly. For heavier loads, use multiple strips or combine with other methods like freestanding supports.
Can I use these methods in an RV or camper?
Absolutely. Compression-fit wood shelves work exceptionally well in RVs because they rely on friction rather than wall attachment. They are also completely removable for travel.
How do I remove adhesive strips without damaging paint?
Pull the tab slowly downward at a low angle. Command strips are designed to release cleanly without damaging paint when pulled correctly.
Are no-drill shelves sturdy enough for everyday use?
Yes, when properly installed. Compression-fit shelves handle 15 to 25 pounds per shelf, freestanding units handle 10 to 15 pounds, and rod-supported systems handle 30 plus pounds. Always stay within rated capacity.
Key Takeaways for Adding Closet Shelves Without Drilling
No-drill shelving is not a compromise. It is a smarter way to organize that works for renters, RV owners, and anyone wanting reversible storage. The four main methods each serve different needs: compression-fit wood for tight spaces, freestanding units for quick setup, adhesive strips for lightweight items, and rod-supported shelves for heavy loads.
With the right materials, precise measurements, and a little creativity, your closet can hold more without costing you a security deposit. Choose your method based on weight needs, measure twice, and build storage that grows with you.





