
How to Add Cabinet Doors to Shelves
Open shelves look great in design photos, but in real life they collect dust, hide clutter, and make your space feel chaotic. You do not need to replace your entire bookshelf or buy expensive custom cabinets to solve this problem. Adding cabinet doors to existing shelves is a practical DIY upgrade that transforms bookcases, pantries, and built-ins into sleek, enclosed storage without the premium price tag.
This guide walks you through every step of how to add cabinet doors to shelves, from measuring accurately to installing hinges and achieving perfect alignment. Whether you are upgrading an IKEA BILLY bookcase or enclosing garage shelving, you will learn exactly how to measure, build, and install doors like a pro using affordable materials and basic tools.
Measure Shelf Openings Accurately
Precise measurements are the foundation of a professional-looking installation. Even a small error can cause doors to bind, gap unevenly, or sit crooked.
Find Your Smallest Internal Dimensions
Grab a tape measure and check the inside width of your shelf opening at three points: the top, middle, and bottom. Do the same for height, measuring both sides and the center. Always use the smallest measurement you find, because most mass-produced furniture is slightly out of square.
Subtract 1/8 inch from both width and height to allow smooth operation and clearance for hinges. For example, a 24-inch wide by 36-inch high opening becomes a 23-7/8 inch by 35-7/8 inch door.
Pro tip: If your shelf has a front lip or face frame like IKEA units, measure from the outer face to determine how much overlay you need for proper hinge placement.
Account for Frame Type
Frameless (European-style) cabinets mount doors directly to the cabinet edge. Face-framed units require spacers or hinge shims to bridge the gap between the inner cabinet wall and the outer frame. Use a level and combination square to verify your unit is square and stable before proceeding. If you notice warping or wobble, reinforce the unit with back panels or corner brackets first.
Build Strong Door Frames with Pocket Holes
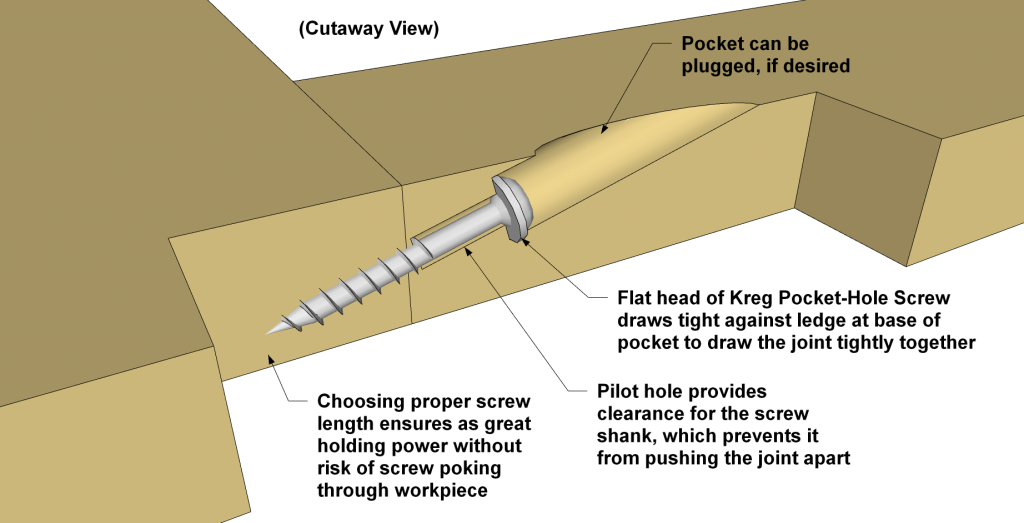
Pocket-hole joinery creates strong, square door frames with hidden joints. This method is beginner-friendly and produces professional results without expensive equipment.
Cut Frame Components to Size
Use 3/4-inch thick 1×3 boards for the stiles (vertical pieces) and rails (horizontal pieces). Poplar, pine, or oak work well. For the center panel, use 1/2-inch or 3/4-inch plywood, birch, or MDF.
Stiles should equal your total door height. Rails should be the door width minus 1.5 inches (accounting for two 3/4-inch stiles). Cut all pieces using a track saw, circular saw with guide rail, or take advantage of in-store cutting services at Home Depot or Lowes. Apply blue painter’s tape along cut lines and score lightly with a utility knife to prevent tear-out.
Assemble with a Kreg Jig
Set your Kreg Pocket-Hole Jig 320 to the 3/4-inch depth setting. Clamp rails securely and drill two pocket holes per end, facing inward toward the panel.
Lay the plywood panel flat and place 1/4-inch shims (cardstock works perfectly) underneath to allow for glue expansion. Apply wood glue to rail ends and attach with 1-inch pocket-hole screws. Check for square by comparing diagonal measurements. Glue and attach stiles with 1-1/4-inch screws, then let the glue dry for 30 to 60 minutes.
Hardwood warning: Use hardwood-specific screws (like Kreg HD) when working with oak or maple to avoid splitting the wood.
Install Concealed European Hinges
Full-overlay concealed hinges provide clean looks and three-axis adjustability, making them ideal for achieving perfect alignment.
Drill Hinge Cup Holes Precisely
A Kreg Concealed Hinge Jig takes the guesswork out of this step. Set the overlay depth (the “3” setting works for full overlay), clamp the jig to the door edge 2 to 3 inches from top and bottom, and drill a 35mm hole using a Forstner bit. Pre-drill 1/16-inch pilot holes for the hinge screws using the jig guides.
The hinge cup should fit snugly with no wobble. Repeat for the second hinge location on each door.
Alternative approach: If you do not have a hinge jig, hand-drill with a depth stop. It is less accurate but still functional for a first-time DIY project.
Mount Hinges to the Door
Attach both hinges to the door using the provided screws, but leave them slightly loose until you complete final alignment. Check that the hinge swing has enough clearance to open fully without hitting adjacent shelves or walls.
Use Spacers for Face-Framed Shelves
If your bookcase has a front lip or internal frame, hinges cannot mount directly to the edge. Spacers solve this problem by creating a flush mounting surface.
Install Pine Scrap Spacers
Cut four 4-inch pieces of scrap 1×3 pine (two per door side). Position these inside the shelf unit at hinge locations, aligned with the outer face of the shelf. Secure with 1-inch screws driven into the inner wall.
The spacer thickness must exactly match the gap between the outer face and inner wall so the hinge sits flush. When closed, your door should sit even with the shelf front with a uniform 1/4-inch overhang.
Mount and Align Cabinet Doors

This is where your project comes together. Take your time with alignment; it makes the difference between a sloppy job and one that looks custom-built.
Hang One Door at a Time
Start by inserting the top screw only on both hinges. Gently close the door and check for even gaps around the perimeter, no rubbing or binding, and consistent 1/4-inch overhang. Use the hinge depth screw to shift the door in or out until the alignment is correct, then tighten all screws.
Fine-Tune with Three-Axis Adjustment
European hinges allow micro-adjustments in three directions. The depth screw moves the door in or out. The height screw on the hinge plate raises or lowers the door. The lateral screw shifts the door left or right.
Use business cards or Door gap spacers to maintain consistent 1/4-inch gaps, especially critical for double-door units. Install both doors, then adjust them together for symmetry.
Pro tip: Adjust both doors simultaneously to ensure they meet evenly in the center with no gap or overlap.
Finish Doors to Match Your Space
A professional finish protects the wood and ties your upgrade into the room’s existing decor.
Prepare and Sand Surfaces
Lightly sand all surfaces with 220-grit paper to smooth joints and edges. Wipe clean with a tack cloth to remove dust. Apply iron-on edge banding to any raw plywood or particleboard edges. Use a heat gun or household iron to activate the adhesive, then trim excess with a utility knife.
Paint or Stain for Cohesion
For painting, use an oil-based or bonding primer on melamine or MDF surfaces, followed by latex or enamel paint in satin or semi-gloss. For staining, solid wood or veneered plywood works best. Apply pre-stain conditioner for even absorption. Finish with a coat of polyurethane (satin or gloss) for protection and sheen. Allow 2 to 24 hours drying time depending on the product.
Add Hardware and Final Touches
Hardware pulls the entire project together while adding functionality.
Install Knobs or Pulls
Mark hardware placement 2 inches from the top and 2 inches from the edge. This standard placement looks balanced and feels comfortable when opening doors. Pre-drill with a 1/4-inch bit to prevent splitting, especially in hardwoods. Attach with the included screws.
Design tip: Match the finish to existing room hardware (brushed nickel, oil-rubbed bronze, or matte black).
Include Latches and Stops
Magnetic latches keep doors securely closed in high-traffic areas. Install small 2-inch by 2-inch wooden blocks in the top inside corner as door stops to prevent over-swing. Some hinges include soft-close limiters to control the opening arc and prevent slamming.
Choose the Right Door Style and Materials
Matching your door style to the space ensures a cohesive look and functional performance.
Select Door Construction Type
Full-overlay doors cover the entire opening and hide imperfections, perfect for modern looks and IKEA upgrades. Recessed panel doors add depth and elegance for traditional decor. Glass inserts work well for display shelves where you want to show contents. Inset doors sit flush within the frame but require precision for a custom look.
Match Materials to Use Case
Bathrooms and garages benefit from moisture-resistant MDF or sealed plywood. Kitchens and pantries pair well with melamine particleboard that resists stains and humidity. Living rooms and offices work best with poplar or birch, which takes paint and stain beautifully.
Avoid using unsealed particleboard in damp areas unless you apply a thorough sealer.
Save Time and Money with Smart Strategies
This project delivers 60 to 90 percent savings compared to prefab or custom cabinet doors.
Cut Costs Without Sacrificing Quality
Use in-store cutting services at Home Depot or Lowes for free or low-cost precision cuts. Buy hinges in bulk (10-packs run $15 to $30). Repurpose scrap wood for test fits and spacers. Apply painter’s tape to minimize sanding and touch-up work.
Invest in Reusable Tools
A Kreg Pocket-Hole Jig 320 costs about $50 and works on countless future projects. The Kreg Hinge Jig runs roughly $35 and ensures perfect alignment every time. A track saw with guide rail costs around $200 but eliminates the need for a table saw.
Troubleshoot Common Issues Fast
Even careful builds encounter hiccups. Here is how to fix the most common problems.
Door Will Not Close Flush
This usually means hinge depth is misaligned. Turn the in/out adjustment screw clockwise to shift the door outward until it sits flush.
Uneven Gaps at Top or Bottom
Height mismatch causes this issue. Use the up/down screw on the hinge plate to raise or lower the door until gaps are even.
Door Rubs on the Frame
Warping or misalignment is the culprit. Lightly sand the binding edge and recheck hinge screws, adjusting laterally as needed.
Hinges Loosen Over Time
Vibration and weak material cause this. Tighten existing screws and upgrade to longer screws that reach into wall studs if possible.
Edge Banding Peels
Poor adhesion leads to peeling. Reheat with an iron, press down firmly, and trim any excess.
Maintain Doors for 10 Plus Years
With minimal care, your cabinet doors can last a decade or longer.
Routine Maintenance Steps
Check and tighten hinge and knob screws every 6 months. Lubricate hinges with silicone spray if squeaking occurs. Wipe doors with a damp cloth monthly and avoid harsh chemicals.
Pro tip: Soft-close hinges reduce wear and prevent slamming, extending the life of your doors.
Frequently Asked Questions About Adding Cabinet Doors to Shelves
Can I add doors to any type of shelf?
Most shelving units can accept cabinet doors if they are structurally sound. Freestanding bookcases, built-in wall units, and IKEA KALLAX or BILLY systems work well. Ensure the unit is stable and can support the weight of doors without wobbling.
What type of hinges work best for DIY door installation?
Full-overlay concealed (European) hinges are the best choice for DIYers. They hide completely for a clean look, offer three-axis adjustment for perfect alignment, and are relatively easy to install with a hinge jig.
How much does it cost to add cabinet doors to shelves?
DIY door construction costs $15 to $25 per door in materials. Prefab cabinet doors run $80 to $150, and custom woodworker doors cost $200 or more. This method saves 60 to 90 percent compared to buying готовые doors.
Do I need special tools to build cabinet doors?
Basic tools include a drill, measuring tape, and level. A Kreg Pocket-Hole Jig and Concealed Hinge Jig significantly improve accuracy and are worthwhile investments for around $80 total. A track saw or circular saw with a guide rail helps with clean cuts.
How long does the project take?
Plan for 2 to 3 hours per pair of doors. Cutting takes 30 to 60 minutes, assembly takes 45 to 60 minutes, hinge installation and alignment takes another 45 to 60 minutes, and finishing time varies from several hours to a full day depending on paint or stain requirements.
Key Takeaways for Adding Cabinet Doors to Shelves
Adding cabinet doors to shelves is one of the most cost-effective DIY upgrades you can tackle. The process rewards precision: accurate measurements, careful frame construction, and patient hinge alignment produce results that rival custom cabinetry at a fraction of the cost.
Focus on these success factors. Measure your smallest opening dimension and subtract 1/8 inch for clearance. Build frames using pocket-hole joinery for strength and clean joints. Use full-overlay concealed hinges with three-axis adjustment for perfect alignment. Install spacers when retrofitting face-framed units. Finish with edge banding and paint or stain to match your existing decor.
From IKEA bookcases to kitchen pantries and bathroom cubbies, this upgrade enhances function, style, and organization in any room. With the right tools and attention to detail, you will achieve professional results that transform cluttered open shelving into custom-style enclosed storage you will love for years to come.





