How to Remove Sliding Shelves from Cabinets
If your cabinet’s sliding shelf won’t come out or you’re trying to deep-clean the interior, you’re not alone. Many homeowners struggle with removing slide-out shelves because the release mechanism isn’t obvious. The good news is that most modern sliding shelves use a tool-free lever system that allows for quick removal once you know where and how to actuate it. In this guide, you’ll learn exactly how to remove sliding shelves from cabinets safely and efficiently, without damaging the rails or cabinet structure. Whether you’re cleaning, repairing, or reorganizing, these clear, step-by-step instructions will get the job done in under 5 minutes.
Fully Extend the Sliding Shelf
Before attempting removal, you must pull the shelf out completely. This exposes the hidden release mechanism built into the rail system. Most full-extension slides allow 95 to 100 percent drawer box access, so getting the shelf to its maximum extension is crucial for visibility and proper disengagement.
Pull Shelf to Maximum Extension
Gently but firmly pull the shelf straight forward until it stops. Do not force it past its natural stopping point. Ensure both left and right rails extend evenly. If one side lags, stop and realign because uneven extension can prevent disengagement.
Visual Cue: Once fully open, look along the outer edge of the metal rail. You should now see a small plastic or metal lever on the lower half of the track.
Locate the Release Lever
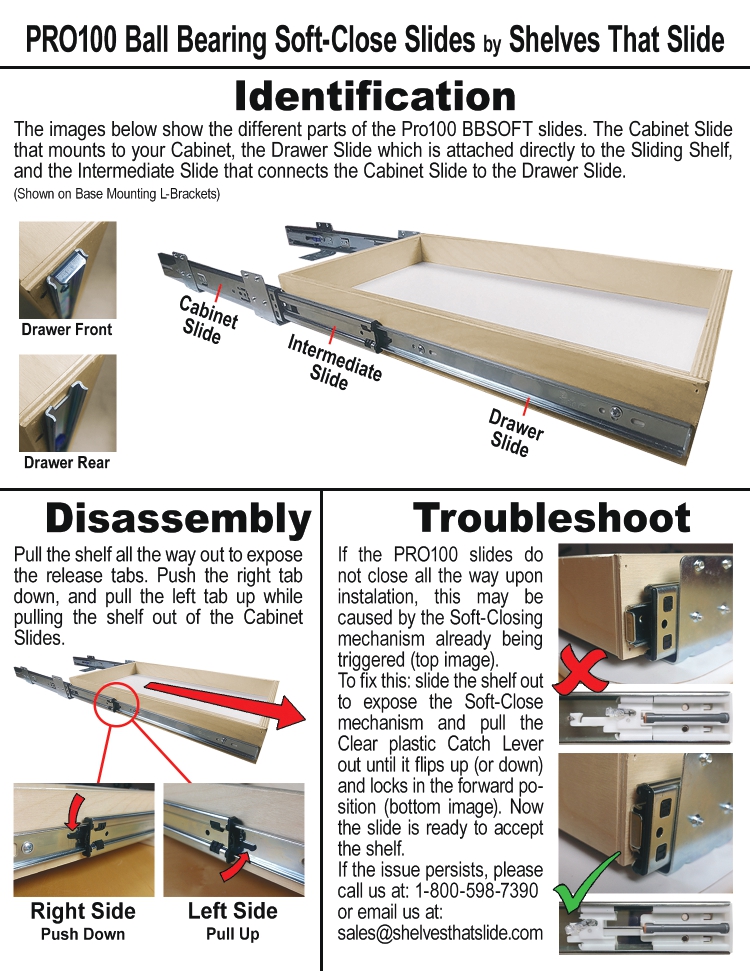
The key to removing any slide-out shelf lies in finding and activating the release lever. This is a small but critical component on the rail assembly that disengages the locking mechanism. The lever is typically black or silver in color, positioned near the front or middle of the rail, and angled slightly downward when locked.
Identify Lever Position
Focus on the lower portion of the rail mounted to the shelf side. Many users miss the lever because they don’t look low enough. It’s not on top. It is on the bottom edge of the rail.
Check Both Sides
Some systems require both levers to be engaged while others sync release actions. Inspect both left and right rails to confirm symmetry before proceeding.
Activate the Rail Release Mechanism
Now that you have found the lever, it is time to disengage the shelf from the cabinet-mounted track. The release lever must be raised upward, which causes the opposing side of the rail to depress or disengage from the mounting track.
Lift the Release Lever Upward
Using your thumb or finger, push the lever upward toward the top of the rail. Apply firm pressure because it may feel stiff if the shelf hasn’t been removed in years. On tight mechanisms, use a flathead screwdriver for gentle assistance, but never pry aggressively.
Warning: Do not twist or pull while lifting. Keep movements controlled and linear to avoid damaging the rail system.
Feel for Disengagement
When the lever is properly raised, you will feel a slight click or drop as the internal clip releases. This means the shelf rail is no longer locked into the cabinet track.
Remove the Shelf from the Cabinet
With the locking mechanism disengaged, the shelf can now be separated from the mounting system. The motion is a combination of lever activation followed by a straight-line pull. Do not attempt to yank, twist, or lift the shelf while removing because this may damage the rail system.
Pull Shelf Straight Forward
While holding the lever up or immediately after lifting it, pull the entire shelf straight out of the cabinet. Do not tilt, lift, or angle the shelf. Movement should be smooth and horizontal.
Pro Tip: If resistance occurs, pause and recheck lever position. Forcing the shelf can bend rails or damage rollers.
Set Aside Safely
Place the shelf on a soft surface like a towel or cardboard to avoid scratching surfaces or damaging the slide hardware.
Reinstalling the Sliding Shelf Correctly
Knowing how to reinstall ensures your shelf functions smoothly after cleaning or maintenance. Proper alignment during reinsertion is critical for proper re-engagement and smooth operation.
Align One Side First
Insert one side of the shelf rail into the cabinet track, sliding it in about halfway. Keep the shelf level. Avoid pushing all the way in yet.
Engage the Opposite Rail
Slide the second rail into its track, ensuring both sides are parallel and aligned. Misaligned rails cause binding and poor closure. Visually check that the front of the shelf is square.
Seat and Lock the Rails
Push the shelf fully into the cabinet until you feel resistance. Then, pull it back 1 to 2 inches to activate the locking mechanism. This pull-back-to-lock action re-engages the internal clips. Test by gently tugging the shelf. It should stay securely in place.
Success Check: Open and close the shelf several times. It should glide smoothly without wobbling.
Troubleshooting Common Removal Issues

Even with the right steps, problems can arise. Here is how to fix them fast.
No Lever Visible
If you cannot find a lever on the lower rail, your system may use a push-button release. Press inward on a tab instead. Your system could also be a bottom-mount slide requiring shelf inversion to access clips. Consult manufacturer specs. If no documentation exists, search model number plus slide removal.
Lever Won’t Lift
Several causes exist for this common issue. Debris buildup in the rail requires cleaning with compressed air or a brush. Rust or dry joints mean you should apply silicone-based lubricant, wait 5 minutes, then retry. Worn or broken lever means you need to replace the rail assembly if cracked or loose.
Shelf Sticks During Removal
This usually means only one lever was activated. The shelf may be being pulled at an angle. Rails could be misaligned or damaged.
Fix: Re-center the shelf, fully extend again, and repeat the release process with both hands.
When to Remove vs. Replace Sliding Shelves
Not every issue requires removal. Know when to pull the shelf and when to upgrade.
Remove and clean when dealing with dust or debris in the cabinet, sticky or uneven glide that needs lubrication, or when refinishing cabinetry for full access.
Replace when dealing with a broken lever or bent rail, or when soft-close function is lost and may need new slides.
Pro Insight: If replacing, consider upgrading to full-extension ball-bearing slides for smoother performance and better load capacity.
Maintenance Tips for Long-Lasting Slides
Keep your sliding shelves working like new with simple upkeep.
Clean Rails Monthly
Wipe tracks with a dry or slightly damp cloth. Remove crumbs, grease, or pet hair that can jam mechanisms.
Lubricate Every 6 Months
Use a silicone-based lubricant, not oil-based, to prevent grime buildup. Apply sparingly to rollers and contact points.
Tighten Mounting Screws
Check screws on both cabinet and shelf rails twice a year. Loose hardware leads to sagging and misalignment.
Inspect for Wear
Look for cracked plastic levers, chipped or rusted metal, or wobbly movement when extended. Replace worn parts immediately to avoid sudden failure.
Compatible Shelf Types and Limitations
This removal method works for most common residential systems, but not all.
Works with side-mounted ball-bearing slides, roller-based pull-out shelves, soft-close mechanisms with visible levers, and under-cabinet spice racks or trash bins.
Does not work with bottom-mount drawer slides requiring release tabs underneath, center-mount or concealed slides, older wooden runner systems, or fixed shelves without slide hardware.
Alternative Systems: If your cabinet uses hidden clips or push-to-open tech, removal involves different steps, often requiring tools or partial disassembly.
Real-World User Tips and Shortcuts
Learn from others who have mastered the process.
I Didn’t See the Lever at First: Many users report missing the lever because it blends into the rail. Shine a flashlight at a low angle across the rail to reveal shadows and contours.
It Took Two Hands: Use one hand to lift the lever on each side simultaneously, then pull with both hands. Wear rubber gloves for extra traction on slick metal.
I Label Before Removing: If working with multiple cabinets, label shelves and rails to ensure correct reassembly. Use painter’s tape and a marker. No residue will be left behind.
Key Takeaways for Removing Sliding Shelves
The standard method for removing a sliding shelf involves pulling the shelf fully out, raising the lever on the lower half of the rail, and pulling the shelf straight off. This lever-based release system is the most commonly encountered design in residential cabinetry. The process is tool-free and reversible, allowing for easy reinstallation. Correct alignment during reinsertion is critical for proper re-engagement and smooth operation. Always verify your slide type before starting. When in doubt, consult the manufacturer or test on a less-used cabinet first. Now that you know the process, cleaning behind, under, or inside your cabinets just got a whole lot easier.
Frequently Asked Questions About Removing Sliding Shelves
Can I remove sliding shelves without any tools?
Yes, most modern sliding shelves use a tool-free lever system. The release lever is located on the lower half of the rail and can be manipulated by hand. Simply extend the shelf fully, lift the lever, and pull straight out.
What if my sliding shelf has no visible lever?
If you cannot find a lever, your system may use a push-button release or bottom-mount slides with hidden tabs. Check the underside of the shelf or consult your cabinet manufacturer’s documentation for specific removal instructions.
Why won’t the release lever lift?
The lever may be stuck due to debris buildup, rust, or dried lubricant. Clean the rail thoroughly with compressed air and apply silicone-based lubricant. If the lever is cracked or broken, you may need to replace the rail assembly.
How do I reinstall a sliding shelf correctly?
Insert one rail partially into the cabinet track, then align and insert the second rail. Push both rails fully in until you feel resistance, then pull them back 1 to 2 inches to engage the locking mechanism. Test by opening and closing several times.
Does this method work for all types of sliding shelves?
This method works for side-mounted ball-bearing slides, roller-based pull-outs, and soft-close mechanisms. It does not apply to bottom-mount slides, center-mount concealed slides, or older wooden runner systems.