
How to Build Pantry Shelves in a Closet
Tired of cluttered, flimsy wire shelves that make organizing impossible? You’re not alone. Thousands of homeowners are transforming their closets into sleek, high-functioning pantries with custom-built shelving, and you can too, without hiring a contractor. The keyword how to build pantry shelves in a closet leads to a project that’s equal parts practical and transformative: replacing outdated storage with a clean, sturdy, and fully customized system that maximizes space and simplifies daily life.
Building pantry shelves in a closet is more than just adding wood and screws. It’s about creating a seamless, built-in look that elevates your kitchen’s functionality while supporting heavy appliances, eliminating awkward gaps, and designing zones for every type of item. This guide walks you through every step, from measuring your space to installing finished trim, using only common tools and affordable supplies.
Plan Your Pantry Layout for Maximum Function
Before cutting any wood, map out your ideal storage setup. A well-planned layout ensures shelves fit your items perfectly and function smoothly for years to come.
Measure Your Closet Interior
Start by recording the height, width, and depth of your closet interior. Note any obstructions that affect placement. Use a tape measure and notepad to sketch the space. This helps visualize shelf placement and identify problem areas early.
Locate Wall Studs for Secure Anchoring
Shelf strength depends entirely on anchoring into wall studs. Use a stud finder to locate them, typically spaced 16 inches or 24 inches apart. Mark each stud position on the walls with a pencil. These points determine where your support braces go.
Pro Tip: If no stud aligns with a shelf level, use heavy-duty wall anchors rated for 50+ lbs per fastener, but always prioritize direct stud attachment when possible.
Determine Optimal Shelf Heights
Customize heights based on what you store in each zone. Leave breathing room for easy access and avoid cramming shelves too close together. Keep the bottom shelf for heaviest items like food processors or bulk bags.
Choose Materials That Match Your Budget and Style
Material choice affects durability, appearance, and total project cost. Pick based on your needs and skill level for the best results.
Select Shelf Board Material
| Material | Best For | Notes |
|---|---|---|
| ¾ inch Melamine | High-traffic pantries | Scratch-resistant, no finish needed |
| ¾ inch Plywood | Custom painted look | Requires edge treatment |
| ¾ inch MDF | Painted pantries in dry areas | Smooth finish, must seal against moisture |
| 1×12 Solid Wood | Rustic or farmhouse style | Needs sanding, staining, sealing |
Budget Note: A full build using MDF, pine trim, and paint can cost under $200.
Gather Support Components and Fasteners
You will need several support items to build a sturdy system. Gather 1×2 or 1×3 primed pine for wall braces and front edging. Pick up 2×2 lumber for center posts or notched corner supports. Get 2×4 framing for base cabinets or leveling on uneven floors. Stock up on #6 wood screws (2½ inches), construction screws (3 inches), brad nails (1¼ inches), waterproof wood glue, construction adhesive, and paintable caulk.
Install Wall Braces That Support Heavy Loads
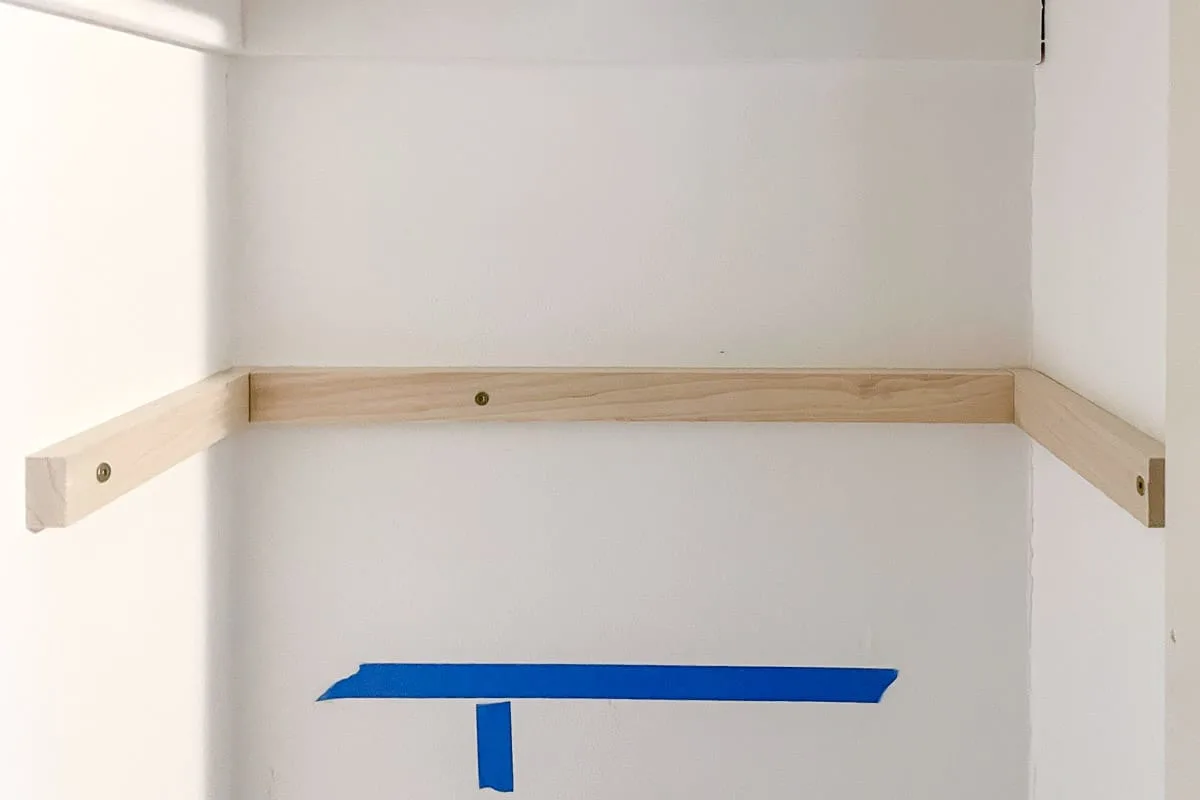
The backbone of your system is a series of horizontal braces anchored directly to studs. These carry the shelf load and prevent sagging over time.
Cut and Position 1×2 Braces
Measure and cut 1×2 boards to span each wall at every shelf height. Place the top edge of the brace at your marked shelf level. Apply wood glue to the back of the board, then position it against the wall. Temporarily secure with 1¼ inch brad nails.
Anchor Braces to Studs Securely
Use a mini level to ensure the brace is perfectly horizontal. Pre-drill holes, then drive 2½ inch #6 wood screws into each stud, using two screws per stud. Repeat for all shelf levels and walls. These braces support the back edge of each shelf.
Visual Cue: When done, you should see a clean grid of wooden strips running along the walls at each shelf height.
Cut and Finish Shelves for a Professional Look
Now it’s time to build the shelves themselves. They should be strong, smooth, and ready to install without further work.
Cut Boards Without Chipping
Use a circular saw with a 60-tooth finishing blade and rip guide for straight, chip-free cuts. For melamine, apply masking tape along the cut line, score lightly with a utility knife before cutting, and cut slowly to minimize chipping. Standard depth is 20 inches, allowing clearance from door trim.
Finish Wood Shelves Before Installing
For solid wood or plywood, sand with 120 to 220 grit sandpaper. Wipe clean with tack cloth. Apply your preferred stain, let dry, then apply two coats of water-based polyurethane for spill resistance. Prime and paint MDF or melamine edges before installation.
Build Center Supports for Wide Shelves

For shelves wider than 24 inches, add a center post to prevent sagging and maintain structural integrity over time.
Construct Notched 2×2 Posts
Cut a 2×2 to final height: 3½ inches above the lowest notch to allow room for front trim. Use a scroll saw or jigsaw to cut ¾-inch deep notches at each shelf height. Each notch holds one shelf securely in place. Paint or stain the post before installation.
Install the Support Post
Slide the post into place so shelves rest in the notches. Tap gently with a mallet if tight. Ensure shelves are level before securing. For corner pantries, this post joins two perpendicular shelves cleanly.
Install Shelves Starting From the Bottom
With supports in place, begin installing shelves, working from the bottom up for best results.
Set the Bottom Shelf First
Place the shelf onto the back wall brace. Apply wood glue on top of the brace for added stability. Clamp a 1×2 front trim underneath the shelf front to add strength and hide raw edges. Secure the trim with 1¼ inch brad nails every 6 to 8 inches. Fasten the shelf to the back brace with additional brad nails.
Add Remaining Shelves Level by Level
Repeat for each level, ensuring perfect alignment. For center-supported shelves, slide the 2×2 post into notches and verify level before securing. Never rely on glue alone. Always use mechanical fasteners for safety.
Warning: Never rely on glue alone. Always use mechanical fasteners like nails or screws for safety and long-term stability.
Add Trim for a Built-In Appearance
Trim transforms basic shelves into a built-in look that feels professionally installed and seamlessly integrated with your kitchen.
Attach 1×3 Front Ledge
Use primed pine 1×3 boards for a decorative front edge. Miter the corners at 45 degrees for clean joints. Apply wood glue, then nail with 1¼ inch brad nails every 6 to 8 inches. Caulk all seams and nail holes after installation.
Finish Side Edges Neatly
Where shelves meet side walls, use 1×2 boards to cover gaps and raw edges. These also help conceal minor alignment issues. Caulk and paint all joints for a flush, unified appearance.
Create Custom Zones With Dividers and Cubbies
Customize your pantry with zones for trash, cleaning supplies, or appliances that need dedicated space.
Build Vertical Dividers
Cut ¾-inch melamine or plywood strips to desired height. Notch the top back edge to fit over the rear wall brace. Secure from behind using plastic L-brackets, wood glue, and caulk for invisible seams. Create sections for pet food, recycling bins, or vacuum storage.
Install Optional Countertop Space
For extra prep space, place butcher block on top shelf or cabinet base. Ensure it’s food-safe and sealed properly. Reapply mineral oil or polyurethane annually to maintain the surface.
Test Strength Before Loading Your Shelves
Before stocking up, verify your shelves can handle real-world use without sagging or failing.
Perform a Load Test
Place heavy items like a stand mixer (about 25 lbs), a beach cooler (about 40 lbs), or stacked bins on each shelf. Observe for sagging or creaking. Well-built shelves support over 50 lbs per linear foot when anchored to studs properly.
No Sag Rule: If shelves dip more than 1/8 inch, reinforce with edge strips, additional braces, or laminated backing by gluing two boards together.
Maintain Your Pantry for Long-Term Use
Keep your pantry functional and attractive for years with regular maintenance and care.
Clean and Inspect Regularly
Wipe shelves with a damp cloth, never soaking them. Check screws and brackets every 1 to 2 years. Retighten any loose connections promptly to prevent bigger problems later.
Reapply Sealant Annually
For butcher block tops, use food-safe mineral oil or polyurethane. Reapply once per year to prevent drying and cracking. Touch up paint and re-caulk seams as needed to maintain the built-in look.
Frequently Asked Questions About Building Pantry Shelves in a Closet
How much does it cost to build pantry shelves in a closet?
A full DIY build using MDF, pine trim, and paint typically costs under $200. Costs vary based on material choices, with basic melamine being the most affordable and custom hardwood being more expensive.
Can I install pantry shelves without finding studs?
While possible using heavy-duty wall anchors rated for 50+ lbs, this approach is less reliable. Anchoring directly into wall studs provides the strongest support and prevents shelves from pulling away from the wall under heavy loads.
What tools do I need to build pantry shelves?
Essential tools include a stud finder, circular saw with finishing blade, miter saw, brad nailer, drill or impact driver, level (4-foot and mini), clamps, and sandpaper. A scroll saw helps with notching center supports.
How deep should pantry shelves be?
Standard depth is 20 inches, allowing clearance from door trim. Adjust to 16 to 18 inches for narrow closets. Deeper shelves (18 to 20 inches) work best for appliances like microwaves and stand mixers.
How do I prevent melamine from chipping when cutting?
Apply masking tape along the cut line, score lightly with a utility knife before cutting, and use a fine-tooth blade (60+ teeth). Cut slowly and support the board fully to minimize chipping.
Key Takeaways for Building Pantry Shelves in Your Closet
Building pantry shelves in a closet is a weekend project with lasting impact. Anchor all braces directly into wall studs for maximum load capacity. Level every brace and shelf during installation to prevent problems later. Pre-finish all components when possible for even coverage and a professional look. Use your actual items to test spacing before finalizing shelf heights. With thoughtful design and solid construction, your closet pantry becomes a highlight of your kitchen, organized, durable, and built to last over a decade.





